Translating a floor loom draft to use on a table loom
What does it all mean??? A lot of weaving publications show weaving drafts as “tie-ups” meant for floor looms – so how you do you use these when you have a table loom and you need a “lift -plan”? This article By Robyn Spady explains exactly how to translate a “tie-up” draft – a floor loom draft – to a “lift plan” table loom draft.
If you have an Ashford table loom or are new to multi shaft weaving this post should be enlightening. Be sure to read all the way to the end and be in to win!
Happy weaving!

Kate.
Robyn Spady was introduced to hand weaving at a young age and has been weaving for over 50 years. She is fascinated by the infinite possibilities of crossing threads and loves coming up with new ideas to create fabric and transform it into something new and exciting. She is committed to sharing with the weaving world through her classes and publications. Robyn is also the founder and editor of Heddlecraft® magazine
Translating a floor loom weaving draft to a table loom weaving draft. By Robyn Spady.
Whether you are a seasoned weaving veteran or a newbie, the first time you weave on a table loom using a draft written for a floor loom, you may feel a bit bewildered about how to translate the draft. No worries, my friend. It happens to all of us. Whether we have just purchased a beautiful table loom to take to workshops or have a limited amount of space, translating drafts for a table loom may leave you feeling like you need to decode the information before you can weave. Following the steps presented here should help clear up the mystery.
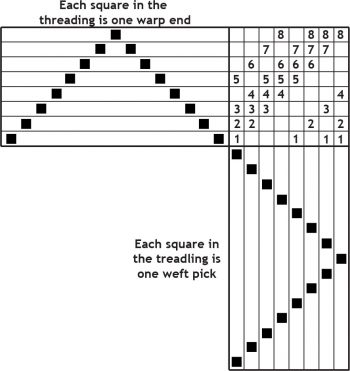
First, let’s start with a draft. The draft shown below includes the threading sequence and treadling sequence. Each black square represents one warp end or weft pick. The grid in the upper right-hand corner with all of the numbers is the tie-up.
If you read this draft right-to-left and top-down, the first warp end is on shaft one and the first weft pick is on treadle one. When treadle one is stepped on, the shafts tied to it – shafts 1, 2, 3, and 5 – will rise if you are weaving on a rising shed or jack-style floor loom. The next weft pick is woven by stepping on treadle two and lifting shafts 2, 3, 4, and 6.
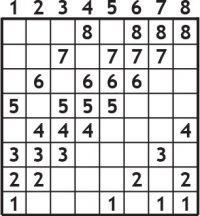
Now, let us take a closer look at the tie-up. Why? Because the tie-up is the essential place to start in translating the above draft for a table loom.
The tie-up shown below is the same tie-up in the draft. The numbers across the top represent the treadle on the loom. There is a total of eight treadles in this tie-up.
Each column corresponds to the shafts tied to that treadle.
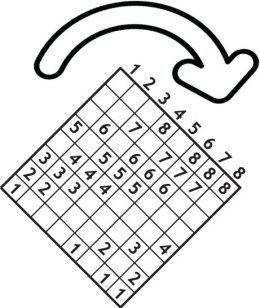
The first step is to rotate the tie-up 90 degrees.
By rotating the tie-up 90 degrees, the tie-up will look like the image shown below. That may look silly, but hold on and make a slight adjustment.
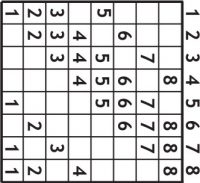
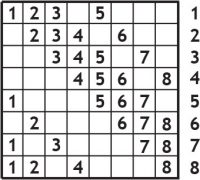
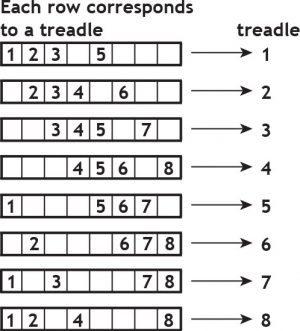
The rotated tie-up in the previous image may be awkward to read; however, without changing the locations of the numbers and rotating the numbers back 90 degrees to read more clearly, we end up with a tie-up that looks like the image shown below. Each row corresponds to a single weft pick and . . .
Each number in each row corresponds to the lever(s) on the loom for that pick and shows which shafts will be raised.
Voila! You have created a key to deciphering the tie-up and treadling sequence in a draft written for a floor loom into a liftplan for a table loom.
Each row corresponds back to a single treadle in the treadling sequence in the original draft.
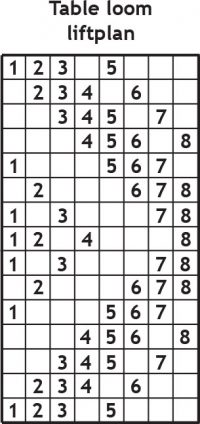
If we now use this key to translate the tie-up and treadling sequence, the difference can be seen in the following images. On the left is the original tie-up and treadling for a floor loom. On the right the information has been translated into a liftplan format. The shafts rising and the shafts staying down remain the same.
For example, in the first pick for the treadling sequence, shafts 1, 2, 3, and 5 rise when the treadle is stepped on. In the liftplan, the levers for shafts 1, 2, 3, and 5 are flipped to lift the appropriate shafts.
All of the numbers in a liftplan can appear a little ominous at first, but if you interpret the information row-by-row it may not seem so complex.
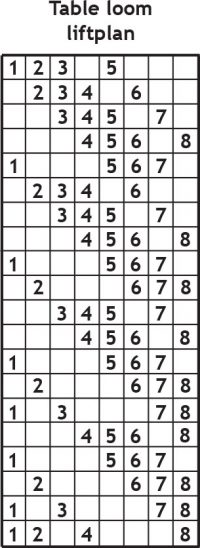
If the tie-up remains the same, the same liftplan key may be used for different treadling sequences as shown in the following images. On the left is the tie-up and treadling sequence. The tie-up is the same, but the treadling sequence has changed to what some might describe as an advancing twill. By using the liftplan key from before, the tie-up and treadling sequence can be translated into a liftplan for a table loom. If the tie-up changes, you can develop a new liftplan key.
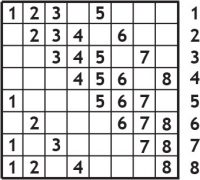
The liftplan key shown earlier is shown below. It was developed for a table loom where the lever on the far left raises shaft one and the lever on the far right raise shaft eight.
But, what if you have a table loom with the lever on the far right raising shaft one and the level on the far left raising shaft eight? Well, that adaptation is pretty easy.
Start by turning the tie-up 90 degrees and then invert the tie-up to create a liftplan key where the lever to the far right raises shaft one and the lever to the far left raises shaft eight.
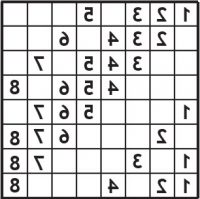
If the backward numbers displease you, turn the numbers around without changing their position.
Table looms are great. They are usually portable and easy to transport to different rooms and workshops. Another advantage of a table loom is the ability to weave any pattern without changing a tie-up or wondering if you have enough treadles on your loom. Did you know there is a total of 254 ways to tie-up a treadle on a loom? Yikes! You can see how easy it would be to run out of treadles. With a table loom, you avoid tying up altogether.
Click to view weaving tutorials
For warping and weaving tutorials, Learn to weave booklets, advice, and inspiration.

